 AZ TOOLS

AZ Viewport Recorder
Perform the animation instead of keying it: drag the controls with the manipulator while Maya plays, and the motion becomes keys the moment playback stops.
- Animation
- Version 1.11.2
- Maya 2023 – 2027
- Windows
- Free

What it does
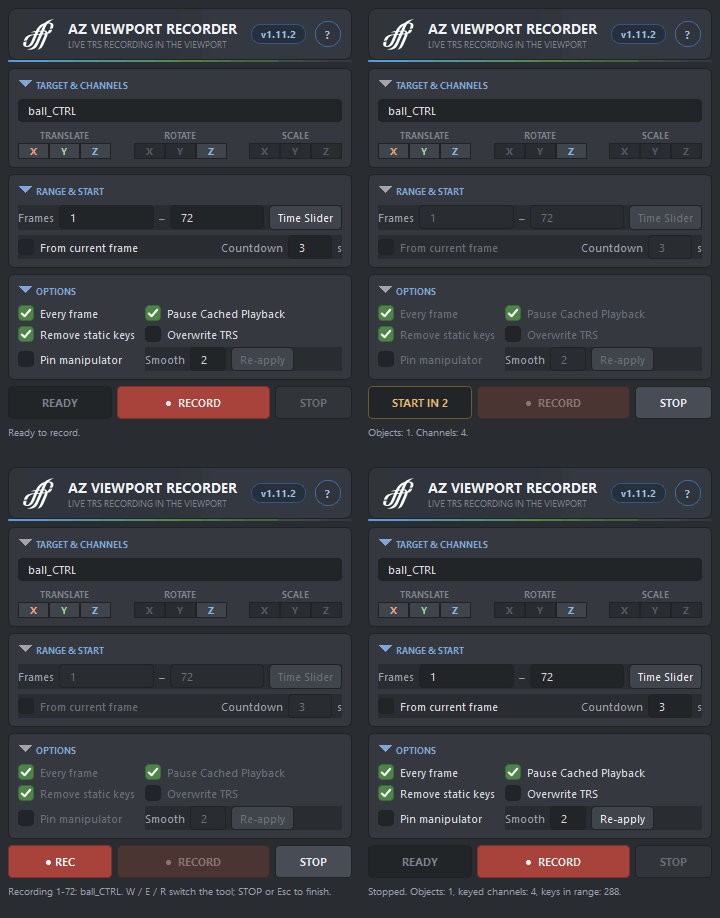
Select one or several controls, pick the channels, press RECORD. After a countdown Maya plays the frame range and you move, rotate or scale the controls with the normal manipulators, switching tools with W, E and R as usual. When playback stops, everything you did is written as animation keys, in one undo step.
It is meant for the kind of motion that is faster to perform than to key: a hand-held camera, a prop that is carried, overlapping action on a tail or antenna, secondary motion on a face control, a quick blocking pass to refine later.
Workflow
- Select one or several objects or controls. The window shows what will be recorded; child objects are not recorded.
- Enable the X Y Z axes of Translate, Rotate and Scale you want to capture. Clicking a row name toggles the whole row.
- Set the frame range: type it, or Shift+drag a range on the Time Slider and press Time Slider (with nothing highlighted the button takes the playback range).
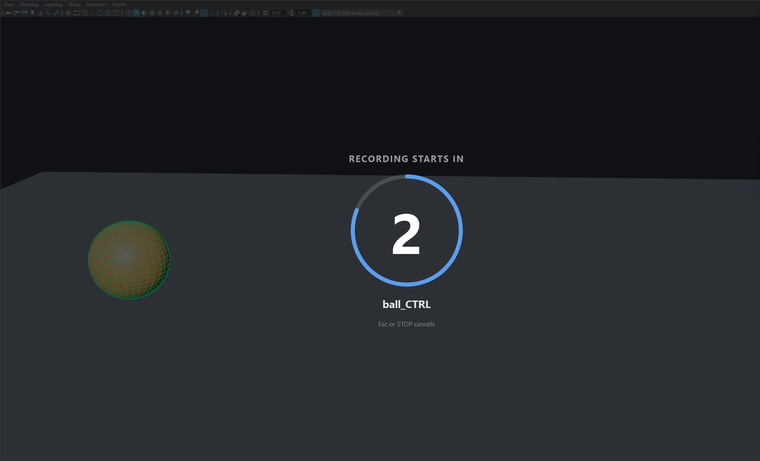
- Set the countdown and press RECORD. The viewport dims and counts down; when it clears, recording starts at once and the badge at the top of the viewport shows REC.
- Move, rotate, scale. Finish with STOP, Esc, or let the range end. The keys appear when playback stops.
- Too jerky? Change Smooth and press Re-apply: the last take is rewritten with the new strength without performing it again.
The window
- Target
- The selected objects at the moment RECORD is pressed, and the channels each of them can take (locked or connected channels are skipped and reported).
- Channels
- Translate, Rotate, Scale with an X, Y, Z button each.
- Range
- Start and End frame, Time Slider to take the highlighted or playback range, From current frame to start wherever the time slider stands.
- Countdown
- Seconds before the take begins (0 – 60), shown over the viewport.
- Every frame
- Playback never skips a frame; a heavy scene then plays slower than real time. Off: real time, frames may be skipped.
- Pause Cached Playback
- The cache is switched off for the take and back on afterwards; otherwise every drag invalidates it and playback stutters. Switch it off if the scene cannot play in real time without the cache.
- Remove static keys
- A channel that never moved and was not animated gets no keys; a hold keeps only its first and last key.
- Overwrite TRS
- Allows recording over existing keys. Only the recorded range is replaced.
- Smooth / Re-apply
- Gaussian smoothing of the recorded motion, 0 off, 2 – 4 light to medium, 10 heavy. The first and last recorded values never move. Re-apply rewrites the last take with the current strength.
- Pin manipulator
- The manipulator stays where it is at the start frame while the object keeps moving with its animation, so a control that travels through the shot stays easy to grab for a re-take.
- RECORD / STOP
- Start the countdown and the take; stop the take or cancel the countdown. The state label shows START IN, REC and the result.
How it works
- Playback with manipulators. The take runs in Maya's interactive playback mode, the only one that keeps the manipulators on screen. Nothing is armed with Maya's own recorder: it cannot key Rotate, its keys are not undoable, and arming it right before a take invalidates the evaluation graph on the first frames of the performance.
- Sampling instead. Every enabled channel is read as each frame arrives, with the same timing as the native recorder, and keyed when playback stops. Existing curves on the recorded channels are detached for the take so they cannot fight the manipulator, then reattached, and only the recorded range is replaced.
- Even timing. Frames do not arrive evenly during playback, so each sample is time-stamped and read back on an evenly paced timeline. Without this a smooth hand motion shakes once it is keyed to the frame grid.
- Smoothing. A Gaussian low-pass over frame distance; rotations are unwrapped first and an Euler flip is never averaged across. The raw samples of the last take are kept for Re-apply.
- Hidden controls. Rigs that hide their controls during playback get them shown for the take and restored afterwards, so nothing vanishes under the hand.
- Smooth playback. Curves are detached and the evaluation graph warmed up before the countdown, Cached Playback can be paused for the take, and sampling reads cached plugs, so the performance itself stays fluid.
Good to know
- The whole take is one undo step. The undo history from before the take is lost: that is how Maya's record playback mode, the one that keeps the manipulator visible, behaves.
- Recording over existing animation needs Overwrite TRS; without it the take refuses to touch keyed channels.
- Several objects can be recorded at once; each keeps its own list of available channels.
- If the scene plays slower than real time, switch Every frame off, or record shorter ranges.
Availability
AZ Viewport Recorder is a free product of AZ Tools, in the Animation category: every registered account can install it from the AZ Tools Manager. The result is plain animation curves, so scenes need nothing extra.
Get AZ Tools Manager